I Can Do All Things Through Christ Who Strengthens Me. Philippians 4:13
And whatsover ye do, do it heartily, so to the Lord, and not unto men. Colossians 3:23

Saturday, November 30, 2013

Heartfelt Creation Floral Key Collection

Hello All,

We are pleased to present the Heartfelt Creations Floral Key Collection. This collection contains a neutral color palette with card panels, papers, stamps and dies that will enable you to create quick cards while achieving the "wow" factor. The Floral Key Collection is a set of key and lock stamps and dies with a paper pack that contains a variety of card fronts, 6" x 6" pieces and 12" x 12" layouts with borders and frames. It's a creative, fun exploration of the vintage spirit. The Floral Key Collection will unlock your imagination to creating incredibly beautiful, "fine art" cards. Take advantage of extra savings when shopping with Heartfelt Creations on Black Friday.

Leave a comment on the Heartfelt Creations blog by December 3rd to be eligible to win the entire Floral Key Collection valued at $200. The winner will be announced on December 4th on the Heartfelt Creations blog.


This project size is 6 x 6. Begin with 6 x 12 sheet of blue cardstock, score at 6 and 9, fold on score lines, cut 6 x 6 piece of blue cardstock. To create easel base see video tutorial here.  Cut (2) different coordinating 6 x 6 card backgrounds from Floral Key Collection paper, trim background to 5 7/8 x 5 7/8, and glue to easel base. Stamp Burnished Key image onto white cardstock using black ink, die cut Burnished Key image using Burnished Key die, color keys with Copic markers, and add keys and lock to card base.  Stamp Floral Doorway & Latch image onto white cardstock using black ink, color with Copic markers, and die cut image using largest A2 matting basic A die, die cut blue cardstock using largest A2 matting basic B die, glue die cuts together, and glue die cuts to card base.  Stamp A Prayer for the Day sentiment onto white cardstock using black ink, die cut sentiment using #5 Classic Ovals Small die, die cut blue cardstock using #6 Opulent Oval die, glue die cuts together, and adhere die cuts to card base using foam squares.
 
Thanks for stopping by. If you would like to see some really great projects, head on over to the Heartfelt Creations blog.
 
Have a Blessed Day
Hugs,
Regina
Heartfelt Creations Products and Products Sold By HC:
HCDP1 238 Floral Key Collection
HCPC 3569 Burnished Key
HCPC 3570 Floral Doorway & Latch
HCPC 3576 A Prayer for the Day
HCD 741 Burnished Key
031460 Opulent Ovals
354804 Classic Ovals Small
1259723 Art Institute Glue – Dries Clear
4252255 Grand Calibur 

Other products used for projects other than Heartfelt Creations: Spellbinders A2 Basic Matting A & B; Memento Tuxedo Black; Copic B23, B24, B26, B32, C2, C3, C4, C5, C6, C7, YG91, YG93; White Cardstock
 

Friday, November 29, 2013

Heartfelt Creations Floral Key Collection

Hello All,

We are pleased to present the Heartfelt Creations Floral Key Collection. This collection contains a neutral color palette with card panels, papers, stamps and dies that will enable you to create quick cards while achieving the "wow" factor. The Floral Key Collection is a set of key and lock stamps and dies with a paper pack that contains a variety of card fronts, 6" x 6" pieces and 12" x 12" layouts with borders and frames. It's a creative, fun exploration of the vintage spirit. The Floral Key Collection will unlock your imagination to creating incredibly beautiful, "fine art" cards. Take advantage of extra savings when shopping with Heartfelt Creations on Black Friday.

Leave a comment on the Heartfelt Creations blog by December 3rd to be eligible to win the entire Floral Key Collection valued at $200. The winner will be announced on December 4th on the Heartfelt Creations blog.


This project size is 5 x 7. Begin with blank card base, sponge edges of card base with antique linen distress ink, die cut Floral Key Paper using #7 basic matting A die, stamp (2) Burnished Key image onto white cardstock using black ink, die cut (1) image using #5 basic matting A die, sponge Burnished Key image with antique linen and weathered wood distress ink, glue die cuts together, and glue die cuts to card base. Die cut second Burnished Key image using Burnished Key die, color keys with Copic markers, and glue images on top of first Burnished Key image. Stamp Burnished Key Hole sentiment onto white cardstock using black ink, die cut sentiment using #2 Decorative Labels Eight die, sponge sentiment with weathered wood and antique linen distress ink, remove die, sponge edges with antique linen distress ink, and glue sentiment to background. Fussy cut roses from Floral Key Collection paper, and glue roses to card.  Trace stamped images with Gelly Roll pen.
 
Thanks for stopping by. Head on over to the Heartfelt Creations blog. The design team has created some fabulous projects.  
 
Have a Blessed Day
Hugs,
Regina
 
Heartfelt Creations Products and Products Sold By HC:
HCDP1 238 Floral Key Collection
HCPC 3569 Burnished Key
HCPC 3573 Burnished Key Hole
HCD 741 Burnished Key
253839 Decorative Labels Eight
1259723 Art Institute Glue – Dries Clear
4252255 Grand Calibur 
Other Products Used for projects other than Heartfelt Creations: Spellbinders 5 x 7 Basic Matting A; Memento Tuxedo Black; Copic E45 and E37; Distress Ink Antique Linen and Weathered Wood; White Cardstock; Gelly Roll Clear Star


Tuesday, November 26, 2013

JustRite Friday Challenge #110 - Bleach Stamping Technique

Hi Everyone,

It's time for the JustRite Friday Challenge #110 - Bleach Stamping Techique. For this challenge, all you need to do is use the bleach stamping technique to stamp SOMETHING on your card.

Okay, this is another first for me, and I must say, I did learn what not to do.

Here's my card. I went with a clean a simple card for this technique. I wanted to bleaching to have center stage.

 
I stamped the trees and sentiment using the bleaching technique.
 
The lessons I learned:
Don't use a very detailed stamp.
When stamping a sentiment, stamp sentiment onto another piece of paper first to remove some to the bleach.
When you are happy with your stamping, LEAVE IT ALONE,or you will probably mess it up trying to add something.
 
Thanks for stopping by
Have a Blessed Day and a Happy Thanksgiving Day
Hugs,
Regina
 
Sorry I wasn't able to comment this week, but I was trying to complete my Christmas cards and get this challenge done before we leave for Florida.
 
Products Used:
Stamps: JustRite O Christmas Tree and Festive Poinsettia
Ink: Clorox Bleach
Dies: Spellbinders A2 Basic Matting A & B
Paper: Gina K Design's 


Wednesday, November 20, 2013

Heartfelt Creations Merry Christmas and Happy New Year

Hello All,

I have a card that I created for this week's Heartfelt Creations posting. It's beginning to look a lot like Christmas, and I'm feeling the Christmas spirit.


This project size is 5 x 7. Begin with blank card base, die cut Frosty Blanket Collection paper using #7 matting A die, die cut Christmas Card Collection paper using #7 matting B die and randomly stamp Winter Season snowflake using Olive grove ink, glue die cuts together, and glue die cuts to card base. Die cut Ornate Gate arch from white cardstock, and glue to card base. Stamp Winter Season onto white cardstock using Olive Grove ink, die cut image using largest classic square die, remove die, sponge image with forest moss distress ink, die cut Frosty Blanket Collection paper using largest Marvelous Squares die, glue die cuts together, and glue die cuts to card base. Stamp All Season Sentiment onto white cardstock using olive grove ink, cut out sentiment, sponge with forest moss distress ink, and glue sentiment onto Winter Season image.  Stamp Petite Poinsettias flowers and Holly Berry leaf onto white cardstock using olive grove ink, die cut stamped flowers using Layered Poinsettia dies, die cut Holly Berry using Ornamental Add On die, layer/hot glue flower alternating the petal, add pearl to center, hot glue leaved to the back of poinsettias, and hot glue to card base.
 
Thanks for stopping by. Head on over to the Heartfelt Creations blog, the design team has created so amazing projects.
 
Have A Blessed Day
Hugs,
Regina
 
Heartfelt Creations Products and Products Sold By HC:
HCDP1 236 Christmas Card Collection
HCDP1 225 Frosty Blanket Collection
HCPC 3415 Petite Poinsettia
125156 Layered Poinsettia
HCPC 3543 Winter Season
HCD 737 Ornate Gate
HCPC 3544 All Seasons Sentiments
HCPC 3551 Holly Berry
HCD 738 Ornamental Add On
253840 Marvelous Squares
459222 Paper Blossom Tool Kit
159223 Paper Blossoms Molding Mat
1259723 Art Institute Glue – Dries Clear
4252255 Grand Calibur
Other Products Used for projects other than Heartfelt Creations: Spellbinders 5 x 7 Basic Matting A & B, and Classic Squares Large; Want 2 Scrap 72 Count Pearls – White; Memento Olive Grove; Distress Ink Forest Moss; White Cardstock; Hot Glue


Wednesday, November 13, 2013

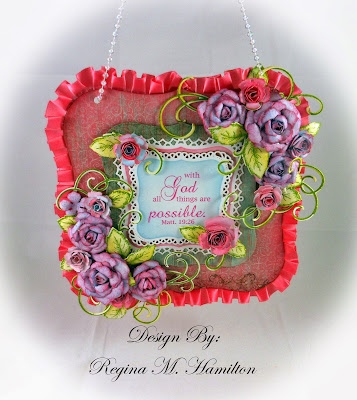
Heartfelt Creations Wall Hanging

Hello Everyone,

Here's a project I made for this week Heartfelt Creations posting. Every now and then I like to try making something different, this week I decided to make a wall hanging.
I also decided to try some brighter colors.  I really like how the colors the flowers turned out, so cheerful. 


This project size is 6 ¾ x 6 ¾. Begin with (1) premade album page, die cut Vintage Florets Collection paper using Grand Labels One #6 die, glue to album page, punch holes, and sponge edges with worn lipstick distress ink.  Dye ruffled trim using worn lipstick reinker, let trim dry, and hot glue trim to the back for die cut. Die cut chipboard and Vintage Floret paper using Grand Labels One #1 die, glue die cuts together, and glue died cuts to center background. Die cut Decorative Labels One #3/#4 dies from white cardstock, sponge #4 die cut with worn lipstick distress ink, sponge #3 die cut with tumbled glass distress ink, stamp Hope in the Lord sentiment onto #3 die cut using rose bud ink, glue #3 and #4 die cuts together, and glue to the center of Grand Labels One die cut.  Stamp Bella Rose Leaves (3) times onto white cardstock using bamboo leaves ink, die cut leaves using Bella Rose die, and sponge with die cuts with crushed olive distress ink.  Stamp Vintage Floret flowers using summer sky ink, sponge with tumbles glass and worn lipstick distress ink, die cut flower using Vintage Floret dies, and make roses using instruction found in video tutorial here. Hot glue Vintage Floret roses and Bella Rose leaves to background. 

Now, head on over to the Heartfelt Creations blog. The design team has created some fabulous projects.

Thanks for stopping by
Have A Blessed Day
Hugs,
Regina
 
Heartfelt Creation Products and Products Sold By HC:
HCDP1 227 Vintage Floret Collection
HCPC 3500 Open Vintage Florets
HCPC 3502 Mini Vintage Florets
HCD 727 Vintage Florets
HCPC 3390 Bella Rose Leaves
HCD 712 Bella Rose
HCPC 3311 Hope in the Lord
452068 Grand Labels One
253731 Decorative Labels One
459222 Paper Blossom Tool Kit
159223 Paper Blossoms Molding Mat
1259723 Art Institute Glue – Dries Clear
4252255 Grand Calibur

Other Products Used for projects other than Heartfelt Creations: Spellbinders Bitty Blossoms; Want 2 Scrap Nestiboard Album Grand Labels 1; Memento Bamboo Leaves, Rose Bud, and Summer Sky; Distress Ink Crushed Olive, Tumbled Glass, and Worn Lipstick; Ruffled Trim; Distress Reinker Worn Lipstick; White Cardstock; Ribbon Fx Pearl Trim

Tuesday, November 12, 2013

WOYWW #232

Hi All,

It's time for another What's On Your Work desk? Wednesday. If you would like to see what all this fun is about, head on over to Julia's blog, Stamping Ground.

Here's my work desk.
There's a lot going on today, but unfortunately, I can't show anything. I'm working on projects for the upcoming release.

Well, I'm still working on REorganizing my crafting supplies. Remember, last week I showed a picture of this ares. Well here it is again if you don't remember.


This is what I done to it. I throw out some of the boxes, and I moved and organized most of my paper. The paper has been sorted by manufacturer, placed into those clear storage pockets, and labeled (sorry I forgot to take a close up pic).

Thanks for stopping by
Have A Blessed Day
Hugs,
Regina
 

Wednesday, November 6, 2013

JustRite Friday Challenge #109 - It's WOW

Hi All,

It's JustRite Friday Challenge #109 - It's WOW time. For this challenge, all we need to do is create a card that is ALL WHITE. This is another first for me, because me and white don't get alone. I can NEVER keep white clean. I'm just lucky Photoshop has a blemish remover.  So here's my card.


 I stamped the poinsettias and border onto white cardstock using VersaMark, and heat embossed with clear embossing powder.  I wish the heat embossing show up better in the photo.


Thanks for stopping by
Have a Blessed Day
Hugs,
Regina 
Products Used:
Stamps: JustRite Festive Poinsettia and Celebration Labels One &Bracket Border One
Dies: Spellbinders Layered Poinsettias, 5 x 7 Basic Matting A, Decorative Fancy Tag Two Folder and Nested Pennants
Ink: Memento Love Letter and VersaMark
Embellishment: Ranger Clear Embossing Powder

Heartfelt Creations You Mean So Much

Hello All,

I altered a paper mache box using Heartfelt Creations Sweet Juliet Collection.


Instructions: Box Size 4H x 3 78D

Begin with paper mache box, paint box using Walnut Brown Metallic 3D Stamp Paint, and cover box and top of lid with Antiquity Collection paper.  Add lace and pearl trim to bottom of box. Die cut (10) Sweet Juliet large flowers and (1) Sweet Juliet small flower, paint die cuts with Walnut Brown paint, glue around box, and add pearls. Die cut (2) Sweet Juliet large flowers, (2) Sweet Juliet small flower, (3) Sweet Juliet foliage dies, stamp and die cut (2) of the largest Tattered Blossom flower from Antiquity Collection paper, and make flower. Glue foliage and flower to box lid. Stamp Moment With You sentiment onto white cardstock using brown ink, die cut with Standard Circles Small die, sponge with brown ink, remove die, die cut Classic Scallop Circles small die from Antiquity Collection paper, glue die cuts together, and add to box using foam squares.

Thanks for stopping by. Head on over to the Heartfelt Creations blog. The design team has created some wonderful projects.

Have a Blessed Day
Hugs,
Regina

Heartfelt Creation Products and Products Sold By HC:
HCDP1 237 Antiquity Collection
HCPC 3568 Moments With You
HCD 740 Sweet Juliet
HCPC 3468 Tattered Blossoms
HCD 722 Tattered Blossoms
119390536 Walnut Brown Metallic 3D Stamp Paint
354808 Standard Circles Small
354811 Classic Scallop Circles Small
1259723 Art Institute Glue – Dries Clear
4252255 Grand Calibur 

Other Products: Paper Mache Box; Memento Rich Cocoa; Kaisercraft Pearl Brads; Want 2 Scrap Sleek Strips Pearls – LaCreme; Lace Trim; Pearl Trim


Tuesday, November 5, 2013

WOYWW #231

Hello Everyone,

It's time for another What's On Your Work desk? Wednesday. If you like to know what all this is about, head on over to Julia's blog, Stamping Ground.

Here's whats is happening on my desk, and in my craft room.

                                                                    (Before)
I'm not doing any crafting today. I'm cleaning and organizing my stamps and dies (a never ending process).

I'm really trying to get my Heartfelt Creations stamped and dies organized so I can find them easier. So I have all my stamps and dies on storage panels, and placed dividers between the sets.

On Saturday, my hubby bought this binder so I can store my larger Spellbinders dies. I like the color a lot, it matches my Grand Calibur. I currently have 13 magnetic panels and the binder has space for my growing collection (so I need to do some shopping). I like that I can store 2 sets of the 5x7 card creator dies on one panel.

                                                                (After)
This is about the cleanest I can get my desk, then it will be a total mess again. BTW..I won that Spellbinders apron a couple of weeks ago.

Now, I need to work on this side of the room, but I need to pick up some supplies from Michael's and JoAnn's first. I'll post a "after" picture next week.

Thanks for stopping by
Have A Blessed Day
Hugs,
Regina

LinkWithin

Related Posts Plugin for WordPress, Blogger...