I Can Do All Things Through Christ Who Strengthens Me. Philippians 4:13
And whatsover ye do, do it heartily, so to the Lord, and not unto men. Colossians 3:23

Showing posts with label Scrapbook. Show all posts

Thursday, February 12, 2015

Heartfelt Creations Butterfly Medley Collection Part 2

Hello Everyone,

Are you longing for springtime...dreaming of sunny hours spent in a lavish flower garden where butterflies flit lazily from blossom to blossom?  Heartfelt Creations invites you to revel in the beauty of springtime with the release of the Butterfly Medley Collection of stamps, dies, and papers.  This uplifting collection is bursting with bountiful botanical roses and a kaleidoscope of fanciful butterflies.  Soft shades of pastel peach, lilac, sage, lemon, teal and pink are the perfect counterpoint for the bleak, grey days of mid-winter.  Beautifully landscaped backgrounds include pastel plaids, cheery polka-dots, flowing script, classic stripes, elegant flourishes, seed packets, garden themed sentiments and images.  Six hand drawn stamp sets featuring botanical roses and butterflies can be paired with two sets of dies, allowing you to stamp and die cut a host of embellishments with a single pass through your die cutting machine.  You'll dream in beauty, plant seeds of encouragement and reap a harvest of creativity when you design with the Butterfly Medley Collection from Heartfelt Creations.
Card size is 5 ¾ x 5 ¾. Start with 6 x 12 piece of white cardstock, fold in half, place the top of the Grand Decorative Circles #2 die slightly above the card base fold line, tape die to card, and cut card base to shape.  Die cut Summer Sunrise cardstock using Grand Decorative Circles #2 die, and glue die cut to card base. Die cut Butterfly Medley paper using Grand Circles #3 die, ink edges of die cut with Rusty Hinge distress ink, and glue die cut to card. Die cut Summer Sunrise cardstock using Grand Stately Circles #1 die, stamp Dream in Beauty image onto white cardstock using Tuxedo Black ink, color image with Spectrum Noir marker, die cut image using Grand Circles #2 die, sponge around image with Rusty Hinge distress ink, remove die, glue die cut to the center of the Grand Stately Circles die cut, and adhere die cuts to center of card using foam dots. Stamp Butterfly Medley and Botanical Wings images onto white cardstock using Tuxedo Black ink, Color butterflies with Spectrum Noir markers, die cut butterflies using Butterfly Medley and Botanical Wings dies, and glue Butterflies to card over the stamped butterfly images. Stamp Botanical Rose flowers onto white cardstock using Morocco ink, stamp Botanical Rose leaves onto white cardstock using Olive Grove ink, die cut flowers and leaves using Botanical Wings dies, color flowers and leaves using Rusty Hinge and Peeled Paint distress inks, shape flowers and leaves, hot glue flowers together, glue Lettuce Entertain You Prills to center of flowers, add Diamond Dust glitter to the tips of flowers, and hot glue flowers and leaves to card.

Thanks for stopping by.
For some more inspiration, head on over to the Heartfelt Creations blog.
Have a Blessed Day
Hugs,
Regina


Heartfelt Creations Products and Products Sold By HC:
HCDP1 251 Butterfly Medley Collection
HCPC 3655 Dream in Beauty Cling Stamp Set
HCPC 3650 Butterfly Medley Cling Stamp Set
HCD1 759 Butterfly Medley Die
HCPC 3651 Botanical Rose Cling Stamp Set
HCPC3652 Botanical Wings Cling Stamp Set
HCD1 758 Botanical Wings Die
ANC850 Spring Bling Prills
TSMP900 Memento Tuxedo Black
TSMP201 Memento Morocco
TSMP708 Memento Olive Grove
DDOTS Double Dots 100pc.
048749 Paper Shaping Tools & Piercing Mat
459222 Paper Blossom Tool Kit
159223 Paper Blossoms Molding Mat
1259723 Art Institute Glue – Dries Clear
Other products used for project other than Heartfelt Creations: Spellbinders Grand Circles, Grand Decorative Circles, Grand Stately Circles; Distress Ink Rusty Hinge, Peeled Paint; Spectrum Noir OR1, OR2, OR3, LG1, LG2, LG3; Papertrey Ink Summer Sunrise; White Cardstock; Twinklets Diamond Dust; Hot Glue

Wednesday, February 11, 2015

Heartfelt Creations Butterfly Medley Collection

Hello Everyone,


Are you longing for springtime...dreaming of sunny hours spent in a lavish flower garden where butterflies flit lazily from blossom to blossom?  Heartfelt Creations invites you to revel in the beauty of springtime with the release of the Butterfly Medley Collection of stamps, dies, and papers.  This uplifting collection is bursting with bountiful botanical roses and a kaleidoscope of fanciful butterflies.  Soft shades of pastel peach, lilac, sage, lemon, teal and pink are the perfect counterpoint for the bleak, grey days of mid-winter.  Beautifully landscaped backgrounds include pastel plaids, cheery polka-dots, flowing script, classic stripes, elegant flourishes, seed packets, garden themed sentiments and images.  Six hand drawn stamp sets featuring botanical roses and butterflies can be paired with two sets of dies, allowing you to stamp and die cut a host of embellishments with a single pass through your die cutting machine.  You'll dream in beauty, plant seeds of encouragement and reap a harvest of creativity when you design with the Butterfly Medley Collection from Heartfelt Creations.

Today's project is an alter canvas that I made for the winter CHA. I've been wanting to try this for awhile, and I finally did it.
Project size is 11 7/8 x 11 7/8. Start with a blank canvas (using the back side of the canvas), trim Butterfly Medley Collection paper to 11 7/8 x 11 7/8, cut a 9 7/8 square section from the center of the paper (this will create the outer frame and the center), ink all the paper’s edges with Broken China distress ink, and glue to canvas. Cut (4) 9 7/8 x ½ pieces of Aqua Mist cardstock, sponge edges with Broken China distress ink, and glue pieces to the inner edges of the canvas. Adhere pearl trim to canvas and adhere ruffle trim to outer edges. Stamp Botanical Rose flowers onto white cardstock using Cantaloupe ink, stamp Botanical Rose leaves onto white cardstock using Olive Grove ink, die cut flowers and leaves using Botanical Wings dies, color flowers with Dandelion and Cantaloupe inks, color leaves with Bamboo Leaves and Northern Pine inks, shape flowers and leaves, glue Prills to center of flowers, and hot glue flowers and leaves to frame. Die cut Aqua Mist cardstock using Romantic Rectangles Two #4 die, die cut photo using 5 x 7 Matting Basics B #4 die, glue die cuts together, and glue to card. Stamp Butterfly Medley and Botanical Wings images onto white cardstock using black ink, die cut images using Butterfly Medley and Botanical Wings dies, color butterflies using Spectrum Noir Markers, and glue to butterflies to frame.

Thanks for stopping by.
For more inspiration, go to the Heartfelt Creations Blog. The design team has created some amazing projects.
Have a Blessed Day
Hugs,
Regina


Heartfelt Creations Products and Products Sold By HC:

HCDP1 251 Butterfly Medley Collection
HCPC 3650 Butterfly Medley Cling Stamp Set
HCPC 3651 Botanical Rose Cling Stamp Set
HCD 759 Butterfly Medley Dies
HCPC 3652 Botanical Wings Cling Stamp Set
HCD 758 Botanical Wings Dies
ANC850 Spring Bling Prills
TSMP900 Memento Tuxedo Black
TSMP103 Memento Cantaloupe
TSMP708 Memento Olive Grove
TSMP707 Memento Bamboo Leaves
TSMP709 Memento Northern Pines
048749 Paper Shaping Tools & Piercing Mat
459222 Paper Blossom Tool Kit
159223 Paper Blossoms Molding Mat
1259723 Art Institute Glue – Dries Clear
Other products used for project other than Heartfelt Creations: Spellbinder Romantic Rectangles Two, 5 x 7 Matting Basics B #4, Memento Dandelion; Distress Ink Broken China; Spectrum Noir CT1, CT2, CT3, CT4; Papertrey Ink Aqua Mist; White Cardstock; Riffle Trim; Elegance Pearl Trim; Wedding Essentials Daisy Pearl Trim; Hot Glue

Wednesday, September 24, 2014

Heartfelt Creations Classic Sunflower Scrapbook Layout

Hello Everyone,

Here's this week's Heartfelt Creation design team posting. This week, we a doing a cross promotional with Creative Embellishments. I used some of their wonderful chipboard on my scrapbook page.
Scrapbook Page size is 12 x 12. Start with a 12 x 12 black cardstock. Trim Classic Sunflower Collection paper to 11 7/8 x 11 x 7/8, lightly distress edges, and glue to black cardstock. Color Creative Embellishments with Copper stamp paint and crackle accents, and set aside to dry. Die cut black cardstock using Detailed Scallops #3 die, and glue to page, trim photo to 3 7/8 x 5 ¾, and glue to center of die cut. Stamp (3) Bella Rose Leaves images onto white cardstock using black ink, die cut using Bella Rose die, color images using Spectrum Noir black marker and Moss Green stamp paint, and glue to scrapbook page. Stamp Sunflower Stem image onto white cardstock using black ink, die cut flowers using Classic Sunflower die, color with Spectrum Noir markers and Copper/Gold stamp paint, shape flowers, hot glue sunflowers together, and hot glue sunflowers to page. Glue Creative Embellishments to page.

Here's some close ups of the Creative Embellishments sentiment, butterfly and corner.
 Thanks for stopping by. 
For more inspiration, go to the Heartfelt Creations blog.
Have a Blessed Day
Hugs,
Regina

Heartfelt Creations Products and Products Sold By HC:
HCDP1 247 Classic Sunflower Collection
HCPC 3627 Sunflower Stem
HCD 753 Classic Sunflower Die
HCPC 3390 Bella Rose Leaves
HCD 712 Bella Rose Die
119390636 3D Stamp Paint Moss Green
119390436 3D Stamp Paint Copper
119390136 3D Stamp Paint Gold
048749 Paper Shaping Tools & Piercing Mat
459222 Paper Blossom Tool Kit
159223 Paper Blossoms Molding Mat
1259723 Art Institute Glue – Dries Clear
4252255 Grand Calibur

Other products used for projects other than Heartfelt Creations: Creative Embellishments Photo or Page Corners Set 2, Family Words, Butterflies Set of 3; Spellbinder 5 x 7 Detailed Scallops; Spectrum Noir EB5, EB7, TN3, TN8, CT1, GB5, True Black; Inkssentials Crackle Accents; Hot Glue

Friday, January 11, 2013

January Stack-a-holic Template Challenge - My Boy

Hello Everyone,

I'm still trying to get some of my scrapbooking done that has been building up for awhile. I really can't see how I will every get it all done, but I'm decided to just take baby steps. Do a page here and there until most of it's done. Well I'm off to a decent start. I've completed two pages in one week.

Today's layout is of a my son's pre-k photo.  I will be entering this on into the January Stack-a-holic Template Challenge at DCWV Diary. For this challenge we will use this sketch and we have to use a DCWV stack.

Here's my layout.

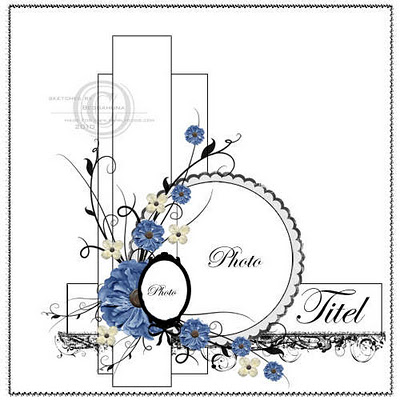
Here's the sketch

 I use a couple of different paper stacks on this layout, but kept the layout monochromatic and I kinda stuck to the sketch.. All the patterned papers were cut and back with black so they would stand out and not fade into the background.

The two larger flowers were made using some of my favorite Spellbinder dies from one of the paper that was used in the background.. The flourishes is also made from a die and the black paper.

The smallest flowers were some that I purchased. They were originally a cream color, I sprayed them with some distress ink so that would match the layout.

Well that's it for me. I hope you all have a Blessed day, and I'll blog with you later.

Hugs,
Regina

Products used:
Paper: DCWV Citrus Stack, Fun In The Sun Stack, and Fun In The Sun Cardstock Stack
Dies: Spellbinders Classic Circles Small, Bitty Blossoms, and Rose Creations;  Cherry Lynn Design Mini Fanciful Flourish
Punch: EK Success Large Flourish Square
Ink: Color Box Fluid Chalk Inkpad Charcoal; Distress Ink Reinker Broken China
Embellishments: American Crafts Thickers Jewelry Box

Wednesday, January 9, 2013

My Sheri Crafts Challenge #101 - All Sports


Happy New Year everyone,

Well it's a new year, and I'm putting away the upsets of the past, getting back to the basic, and doing the things that I enjoy (i.e. reading the Bible, crafting and entering challenges).

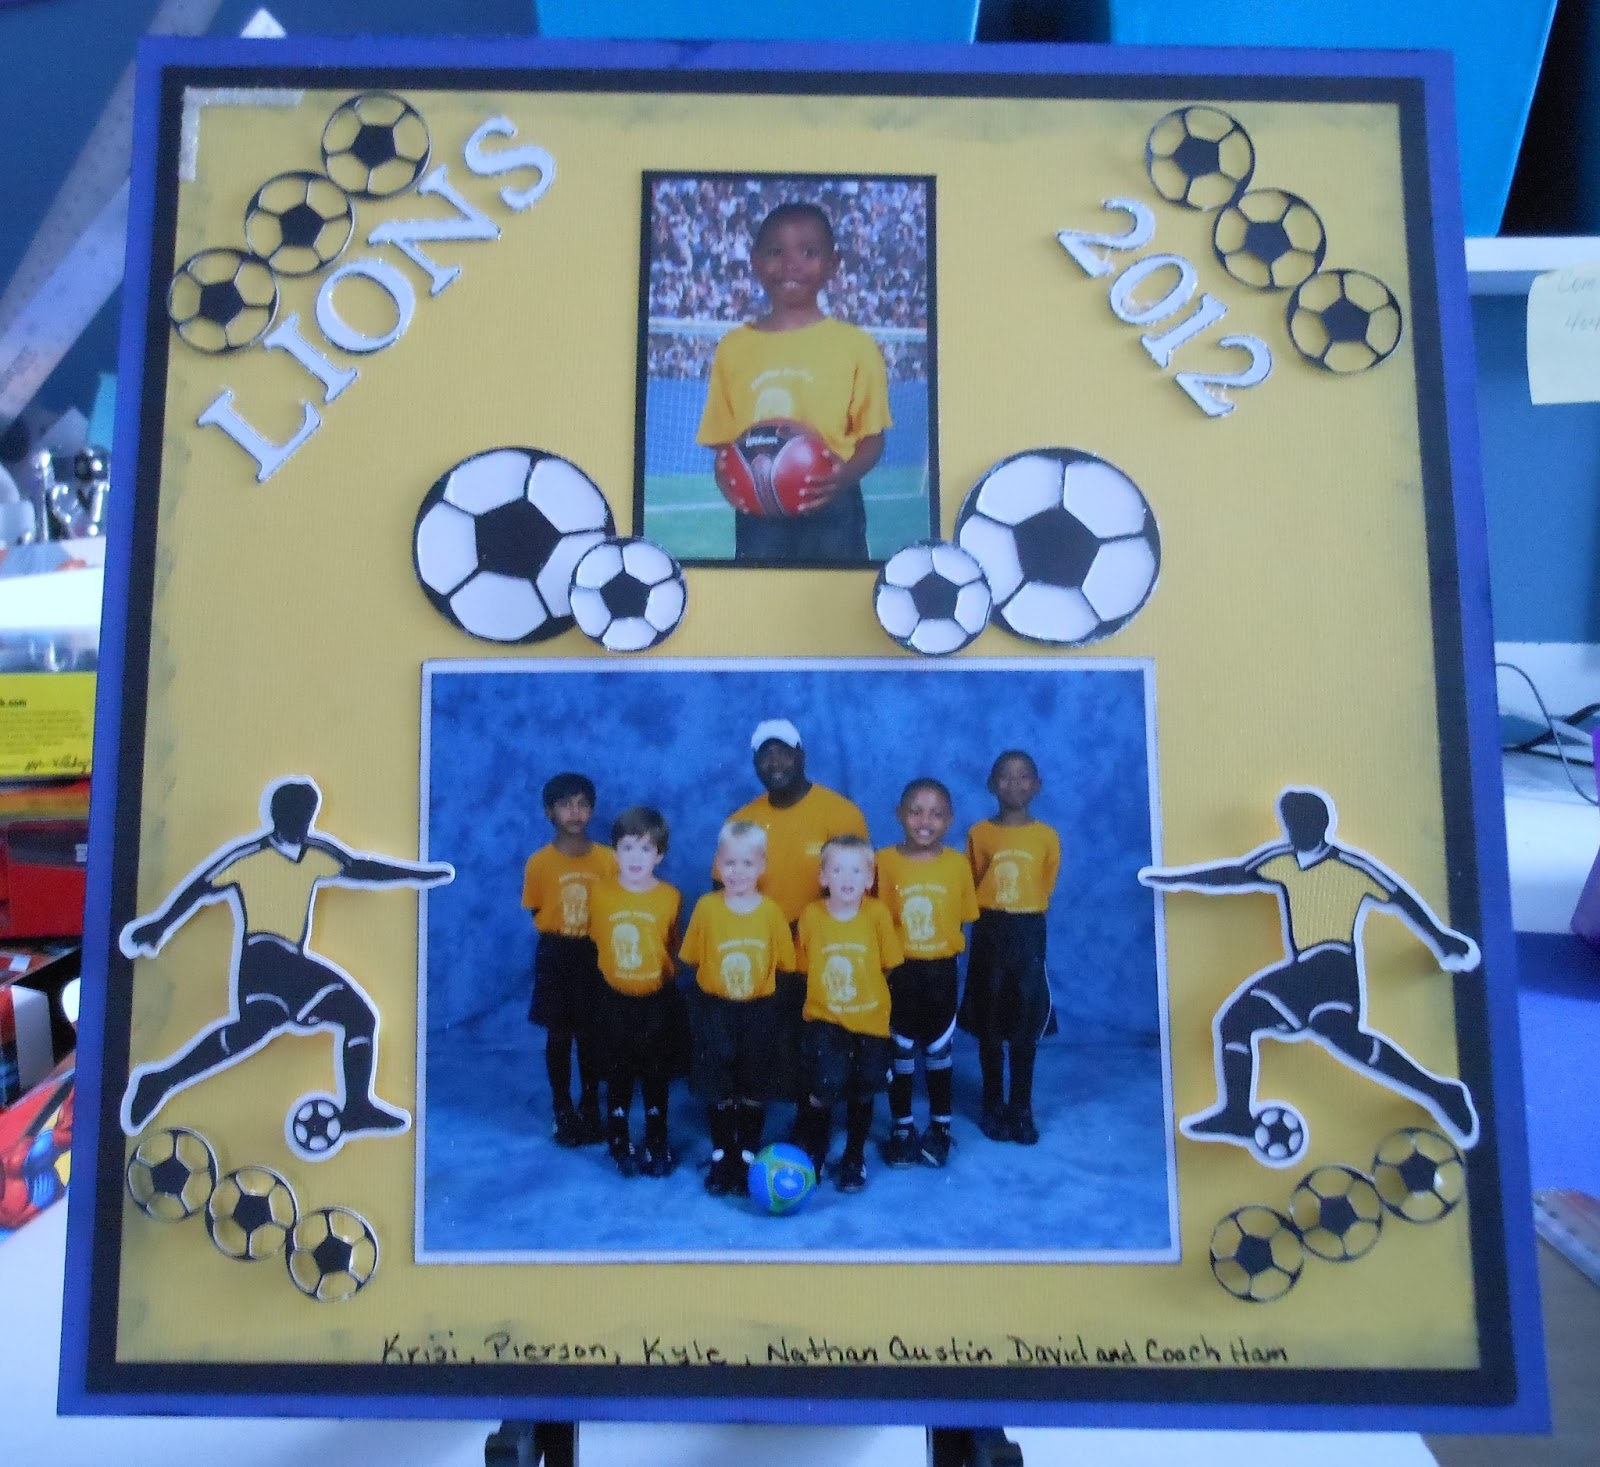
For my first posting of the year, I decided to create a scrapbook page and enter it into the My Sheri Crafts Challenge #101 - All Sports at My Sheri Crafts. For this challenge we are to show some love to the athletes in our lives by creating a project with their favorite sport. So pulled my, much neglected, Cricut off the shelf, and I did a scrapbook layout of my son's soccer photos. 


I kept this layout clean and simple, since this page will be frame and hung in my son' room. I didn't add my usual items (flower or swirls)

Well that's all for me. It has been a long day. Have a Blessed week. I'll blog with you again later.

Hugs,
Regina

Products Used:
Paper: DCWV Citrus and Fun in the Sun Cardstock Stacks
Die: Cricut Sports Mania and Plantin Schoolbook
Ink: ColorBox Fluid Chalk Inkpad Charcoal


Wednesday, December 5, 2012

JustRite Friday Challenge #087

Hello Fellow Crafters,

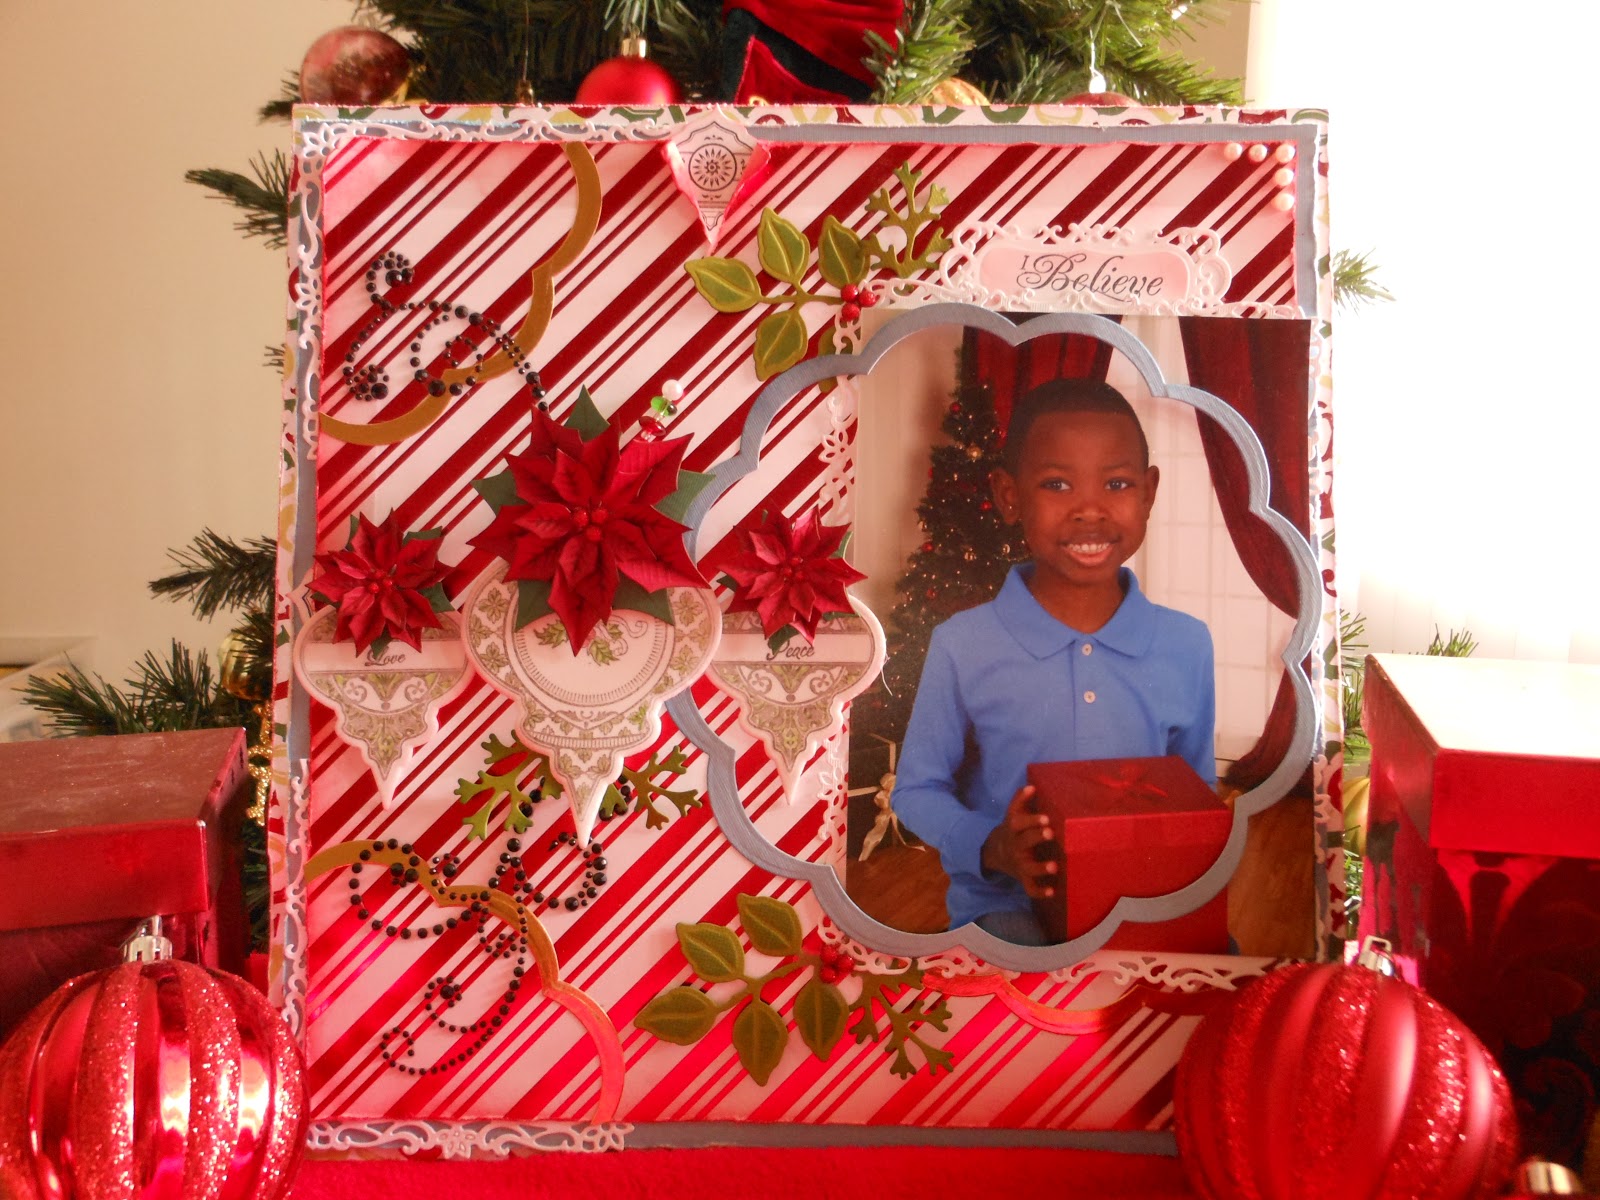
Well I'm here with JustRite Friday Challenge #087 "Picture This". For this challenge, we have to use a photo in our projects, and JustRite Stamps, of course. So I decided to catch up on some of my, much neglected, scrapbooking. This is my son's kindergarten year, and he has already taken quite a few school pictures. So I started my scrapbooking with his Christmas photo.

Of course I couldn't help myself, so I used my dies to make some more poinsettias. This has turned out to be one of my favorite dies. The poinsettias are just too easy to make, and they always turn out great.  I stamped the ornament onto crafting foam and cut them out using the coordinating dies.
 
 
The photo mount, scalloped circle and foliage were created with dies. 
 
 
I distress, tore and inked to edges, and placed a small ornament behind the opening.


I stamped the sentiment onto a die cut and placed it behind the photo mat.

 
I cut a die cut in half and placed it in the top and bottom corner behind the top background paper just to add another dimension to the layout.

Well that's it for me. I have a few more projects to work on before Christmas. Have a Blessed day, and will blog with you later.

Hugs,
Regina

Products Used:
Stamps: JustRite Merry and Bright, and Christmas Nested Sentiments
Dies: Spellbinders Decorative Labels Eight, Grand Big Scalloped Circles, Layered Poinsettia, 2010 Heirloom Ornament and Foliage
Paper: DCWV The Evergreen Stack and Christmas and Winter Cardstock Stack
Ink: StazOn Jet Black; Memento Tuxedo Black; Distress Ink Faded Jeans and Barn Door
Embellishment: Recollection Swirls Black, and Pearls; Crystal Stickers Glitter Domes, Foamfastic White
 

Tuesday, February 14, 2012

I Heart U - Valentine's Day Card

Hello,

Okay, I'm back with a Valentine's Day Card for my DH. I designed it to kinda match the scrapbook LO I previously posted. I used papers from the Swirlydoos' September 2011 kit - Rendezvous and the Feb 6th Card Color Assignment to make this V-Day card.


The background was created using a emboss resisted technique. I stamped the image on to a plain piece of white cardstock with a watermark stamp pad. Sprinkled embossing powder over the the stamped images, and heat set. I then sponged distress ink over the entire page, and wiped off the embossed area with a towel. The flower is handmade using paper from the kit. This was my first time trying this technique, and I do like the way it turned out. I hope my DH will like too. Well that's all I have for you today. Happy Valentine's Day to you and yours. Have a fabulous day, and I'll blog with you again later.

Hugs,
Regina

Products Used:
Swirlydoos' September 2011 Kit - Rendezvous
Papers: Prima's Printry Collection Negative, Signature, and Page Four; Bo Bunny's ET Cetera Collection Geography, Symphony, and Index

Other Products:
Stamp: Stampendous' Jumbo Peony Set
Ink: Tim Holtz's Distress Ink Barn Door, Black Soot, and Walnut Stain; Distress Ink Stain Fire Brick
Embellishments: Epiphany Craft's Heart Bubble Caps


Wednesday, February 8, 2012

So You - Swirlydoos Mystical Winter Sketch Challenge

Hello Everyone,

Today I have another scrapbook layout for you. I'm entering this one into the Swirlydoos Mystal Winter Sketch Challenge.  I mentioned in a previous post, I'm trying to come out of my conservative box, so I'm trying different techniques and materials. Well today I'm actually using premade flowers and deep distressing. Without further ado, here's my take on the sketch..


Here's the sketch


The materials used on this layout are from the Swirlydoo January 2012 Kit. This kit is full of winter scrapping goodness. Unfortunately, I live in Daytona Beach Florida and I don't have any winter or snow pic, but I was still able to use this kit with some pics of my son at the beach.
This is a close up of the flowers.

Close up of the title

Well that's all for me. I hope that you enjoyed this layout. I had fun creating it. I will be back real soon with some cards. I have a lot of card making events coming up. Have a Fabulous Day, and I'll blog with you later.

Hugs,
Regina

Products Used:
Paper: Bo Bunny's Snowfall Cabin and Snowfall Hot Chocolate
Ink: Tim Holtz's Distress Ink Walnet Stain and Broken China
Flowers: Petaloo's Canterbury Rose Brownie, Trumpet Vine Spray Teal
Embellishments: Bo Bunny's Snowfall Trinkets; Prima's Fantasy Fabric Butterfly and Say It In Crystals
Dies: Spellbinders' Grand Label One
Tools: Martha Stewarts Large Circle Cutter and Double Loops Corner Punch

Tuesday, January 31, 2012

Pre K - January SwirlyHues Challenge

Hello,

Today I have another scrapbook LO.  This LO will be entered into the Swirlydoos January SwirlyHues Challenge.  This is a color and sketch challenge. I also had to use one of the Swirlydoos tutorials. 


I used a quite a few different tutorials to create this LO. I used the Image Transfer Tutorial to create my background and the photo. The punched circle photo matte was created using the Corner Punch Deco Circle Tutorial.

I use the Puffed Rose Flower Tutorial and the Poinsettia Flower Tutorial to create the flowers.

I wanted to keep this post short and sweet. Thank you for stopping by and I'll blog with you later. Have a Fabulous Day

Hugs,
Regina

Supplies Used:
Paper: Bo Bunny 12" Snowfall from the Swirlydoos January Kit
Stamp: La Blanche
Ink: Distress Ink Walnut Stain; Glimmer Mist Creme De Chocolat and Electric Blue
Dies: Sizzix's Tattered Pinecone; Spellbinders' Perfect Petals, Rose Creations, Foliage, Classic Triple Scallop Edgeabilities, and On The Vine Border
Punch: McGill's Crystal and Starburst
Embellishment: Artist Loft 12" Stretch Canvas; Prima Letters

Saturday, January 7, 2012

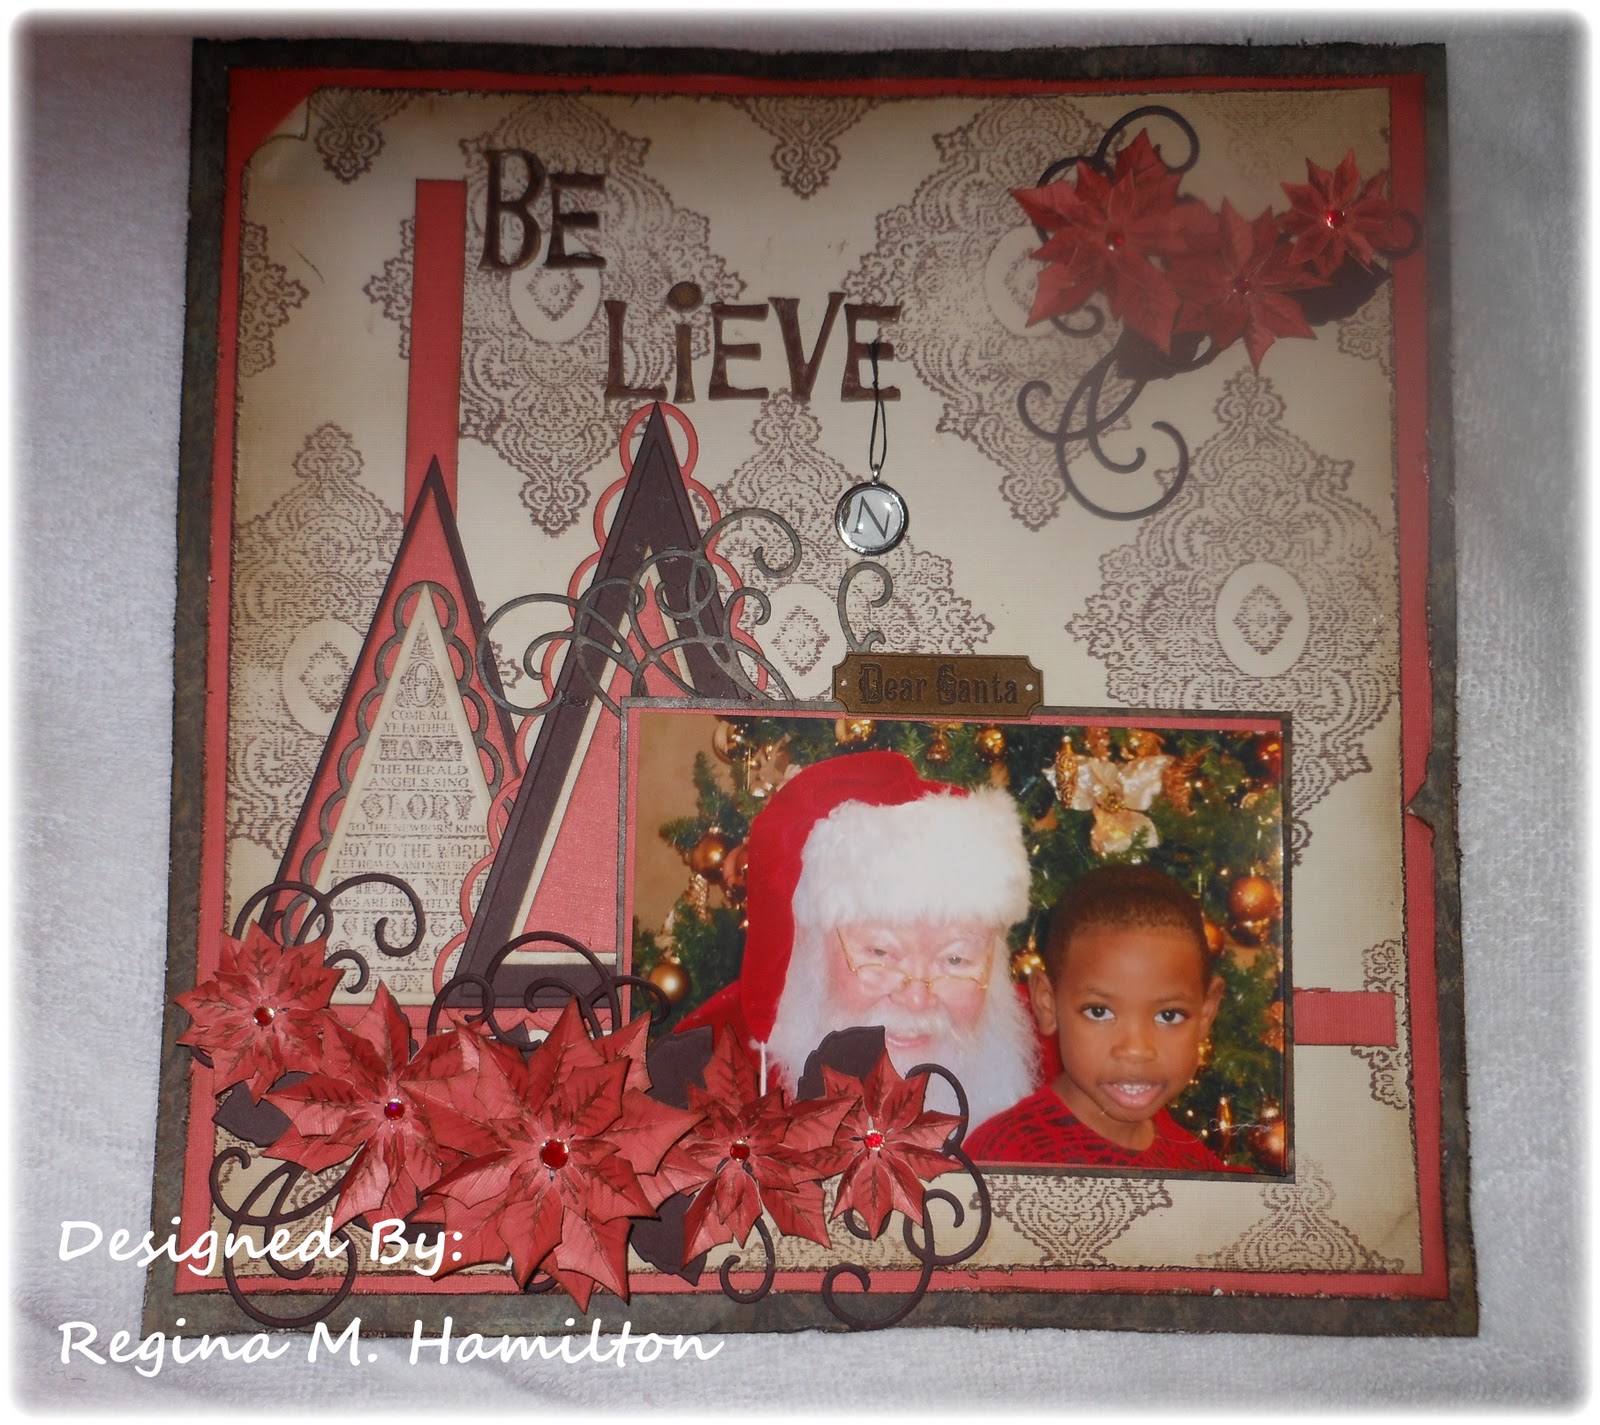
Believe - December SwirlyHues

Hello Everyone,
I'm still working on my 2012 goals, and couple of my goals were to get caught up on my 2011 scrapbooking, and try new techniques. So, I spent today working on a layout for the December SwirlyHues Challenge at the Swirlydoos Blog.   This is a color and sketch challenge, and we have to use one of the technique tutorials on the site. I used the Paper Distressing tutorial found here.

 This challenge gave the opportunity to do a layout of my son's picture with Santa that was taken at school. So one layout down, and at least 10 more to go.


Here are the colors.


And here's the sketch.


I created the background  paper with a large jewel stamp by Stampendous, and then distressing the paper with Tim Holtz Distressing ink pad. All the papers were distressed with a pair of scissors. I made the poinsettias, trees and swirls with dies by Spellbinders.

Thank you for stopping by today. I'll see you again really soon, I'm hoping to get some more crafting done this week.

Have a fabulous day, and blog with you later.

Hugs,
Regina

Products Used:
Paper: Recollection Holiday Traditions and Naughty or Nice
Stamps: JustRite's O Christmas Tree; Stampendous' Imperial Jewel
Dies: Spellbinders Layered Poinsettia, Heartfelt Creations Bella Rose, Lacey Pennant Mega Dies, and Pennants Mega Dies
Ink: Memento's Rich Cocoa; Distress Ink Walnut Stain
Embellishments: TPC Studio Timeless Christmas Metal Accents; Paper Wishes Red Jewel Dazzles; Epiphany Crafts 1/4 Round Bubble Caps and Charm Settings.

Wednesday, August 10, 2011

A Perfect Day - A Scrapbook Page

Hello Everyone,

Today I have another scrapbook LO for your viewing. I'm entering this into the Once Upon A......Sketch August 1st Challenge.   The theme of this challenge is "A Perfect Day". For this challenge, I did another graduation lo, but using brighter colors.  Believe it, or not, I didn't use a doily in this LO.  Here's the sketch.
I just love this sketch. So simple, yet so elegant. Here's my LO.
I didn't use any special techniques on the page. But I did use some new embellishments I recently purchased (rhinestone circle), and some I won (the pins)... All of the colors that were used on this LO were taken from the photo, down to the pearl necklace I was wearing. 
The pearl pins I won on Becca Feeken's blog, aren't they beautiful. She is such a talented lady. The mini roses are made from a die I just purchased. I think their tiny sizes are just too cute.
My journaling says:

May 11, 2001. 
A Perfect Day is seeing a dream become a reality.  It took me quiet some time to finally graduate from college.  Life has a way of stepping in and altering you plans.  But I never gave up on my dream of earning a college degree. And I finally did it!!! It was A Perfect Day.

Well that's if for me. Have a fabulous day and I'll blog with you later.

Hugs,
Regina
Products Used
Paper: Recollections
Die: Die-namics Mini Rolled Flowers
Punch: EK Success
Embellishments: Imaginisce i-rocks gem; Recollections' Adhesive Rhinestones; Becca Feeken Pins

Tuesday, July 26, 2011

Palette #68 - Pink Can Be Masculine

Hello Everyone,
Today I have another scrapbook LO for you using. This LO will be entered into The Color Room's Palette #68 Challenge. Here's this week's color palette.

Here's my take on the color palette and sketch.
I made a LO featuring my DH. Pink and brown tends to be a little girlie, but I was able to make the LO a little more masculine by using more browns. Of course I had to use a doily and make some flowers to with the LO, but I still think the LO has a little masculine feel. I was surprised that my DH really liked it (he hates pics of himself). There's no different techniques on this LO, except I made one of the flowers out of vellum.

Well that's all for me. Have a fabulous day, and I'll blog with you later. 

Hugs,
Regina

Products Used:
Paper: We R Memory Keepers' Urban Window Collection - Diner Napkin Rings; Hot Off The Press Masculine Papers
Punch: Martha Stewart's Deco Fan
Sticker: American Craft's Thickers - Jewelry Box
Ink: Color Box's Fluid Chalk Inkpad - Soft Pastel; Glimmer Mist's Viva Pink and Starfish
Embellishment: Imaginisce's i-rocks; Artifacts Inc.'s Dainty Doilies

Wednesday, July 20, 2011

Ponce Lighthouse - A Scrapbook Page

Hello Everyone,

Today I have yet another scrapbook page. Three in a row. The page will be entered into the Sketchabilities Sketch #51 Challenge. Here's the Sketch.


Here's my page.......

I distressed the edges, and used some chalk ink on the background papers to tone down the intense bright colors.  The flowers was created using a photo tutorial from Swirlydoos. 

Tuesday, I rec'd my prize package from Imaginisce (full of goodies), and it included the i-rock Heat-Setting Tool and gems, so I have added some i-rock swirls to the page a well.  THANK YOU IMAGINISCE....

Well, I will be getting back to card making very soon. I need to make cards for my mom, my sister, and my brother's birthdays.

That's it for me. Have a fabulous day, and I'll blog with you later.

Hugs,
Regina

Products Used:
Paper: DCWV Fun In The Sun Summer Glitter Pack
Punch: Martha Stewart's Double Arches; McGill Super Giant Flower
Die: Cricut Plantin Schoolbook and Home Decor Cartridge
Embellishment: Imaginisce i-rocks;  Butterfly (I can't remember where I purchased them)

Monday, July 18, 2011

That Smile - A Scrapbook Page

Hello Everyone,

Today I have another scrapbook page for (yes, 2 in a row),  I'm beginning to finally really get some of the layouts completed. Now if only I could finish my Christmas layouts finished. This layout is being entered into the The Color Room's Palette #67 challenge. For this challenge, we are to use the following color palette.

Aren't these some great color? Well here's my page, and I used my favorite subject.


During the last Scrapbook Expo, I took the Faber-Castell Mix and Match class, and I've been waiting to use some of the techniques we learned, so I gave the techniques a try on this layout. I tore my background paper, then glued to a piece of cardboard that I've been saving. I smeared some Faber-Castell Gelatos all around the torn edges, and diluted the color with some water. I used the Pitt artist pen around the border of the paper, and diluted the color with some water also. The artist pin and gelatos give the paper some shimmer, that really doesn't show well on camera.


Well that's all for me. Have a Fabulous Day, and I'll blog with you later...

Hugs,
Regina

Products Used:
Paper: Hot Off the Press Masculine Papers
Stamps: Heartfelt Creations HCPC 3303 Posy Patch Flowers, HCPC 3305 Posy Patch Clusters and HCPC 3323 Large Elegant Word Background
Dies: Heartfelt Creations' HCD Posy Patch Die; Cricut Cartridge Jasmine
Copics: E11, E13, E15, E29, E39
Embellishment: Chatter Box's Easy Brad Maker; Imaginisce i-rock; Walton's Doily
Ink: Memento's Rich Cocoa; Faber-Castell Green Mix Media Sampler Green

Saturday, July 16, 2011

Be U - A Scrapbook Page

Hello Everyone,

Today I have another scrapbook page for you. This page was created using the Once Upon A .......Sketch July 15th Challenge, I just love their sketches.  Here are the rules for this challenge:
Journalling Criteria : your journalling has to be a quote (handwritten, printed, rub on etc. ). As an option you can include journalling in the lines on sketch but this is not necessary.

Here's my entry.

I made these sudo glass flowers, by stamping the flower image onto some transparent plastic sheet, coloring the flower with permanent markers, and using a heat gun to melt the plastic. The two smaller flowers and the butterfly are backed with some left over screen material from one of my hubby's jobs. I like the way they turned out. You can find a tutorial for making the flower here.
The quote is from my favorite and my son's favorite children's book author, Dr. Seuss.  The quote says:

"Today you are You, That's truer than True. There is no one alive, who is Youer than You". 
Before I go, I wanted to see you some of my 4 yr old son's stamping, yes stamping. He picked the stamps, mounted them on the acrylic block, inked and stamped the images. Then he colored the images with colored pencil. I'm so proud of him.

Well that's it for me today. Time to spend so more time with my family. Have a Fabulous Day, and I'll blog with you later.
Hugs,
Regina
Product Used:
Paper:  K & Company's KO Addison Blue Garden Swirls; Recollections Black, White and Light Blue; Hot Off The Press' Pastel Vellum Paper
Stamp: Heartfelt Creations HCPC 3303 Posy Patch Flowers and HCPC 3306 Posy Patch Garden Delights
Dies: Heartfelt Creations HCD 702 Decorative Butterfly/Border and HCD 701 Posy Patch Die; Spellbinders' Renaissance Hearts; Cricut Home Accents
Punch: Martha Stewart's Arch Lattice
Embellishment: American Craft's Thicker; Grafix Computer Transparent Plastic Sheets; We R Memory Keeper Rhinestone Brad; Imaginisce i-rock; Artifacts' Dainty Doilies

LinkWithin

Related Posts Plugin for WordPress, Blogger...